

Start here
Connect the Cello MCP server
Connect the Cello MCP server to your editor before you write any code. Your coding tool then has live access to Cello’s docs, your integration’s health, and best-practice recommendations, so it can tell you what to build next and flag what’s still missing. It is also where your integration status lives, so connecting it is how you check your work as you go, not just how you build faster.MCP introduction
Connect your client
Know where you’re building
Everything below happens in your production account, while it is still in pre-launch phase. Events are recorded as test data, nothing is paid out, and notifications don’t send until you launch your program. You don’t need a sandbox for any of it. If integrating in a separate environment suits your development process better, a sandbox is available under My account in the portal, and everything there stays test data as well.Select your event sources
Cello can’t recognise your events until a signup source and a purchase source are both set in the portal. Until they are, nothing you build will flip to verified.Stripe or Chargebee can only be your signup source if your payment-provider customer is created at signup. If the customer is created at first purchase, use the Cello API to send
new-signup at the real signup moment instead.Build your integration
Effort: ~1 day with MCP connected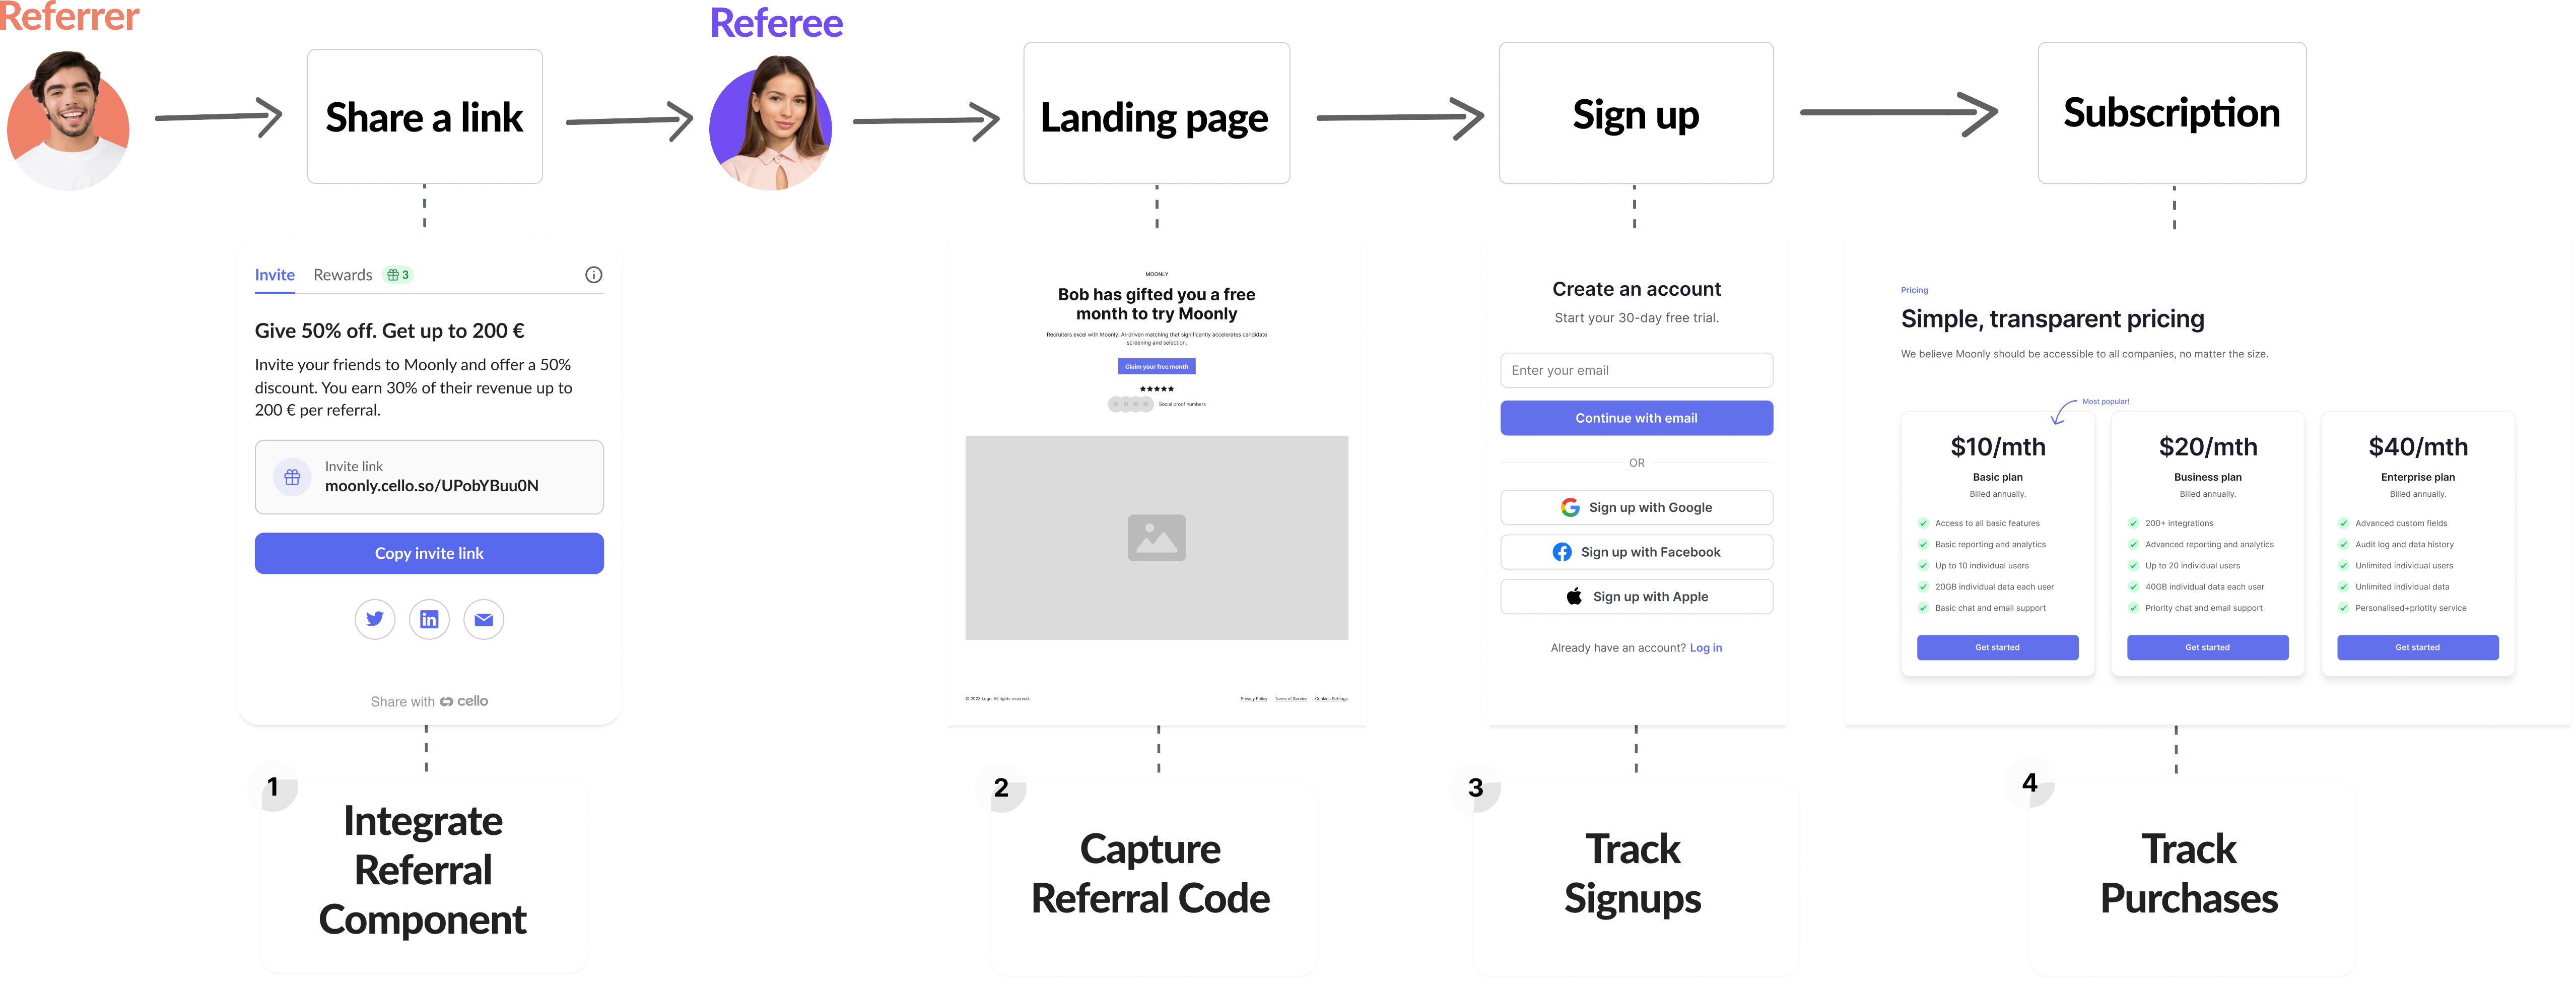
1
Integrate the referral component
Add referral functionality to your web application with Cello’s embeddable Referral Component.You can also integrate the Cello Referral Component into your mobile apps. Choose the appropriate SDK for your platform:
Referral Component Quickstart
iOS SDK
Android SDK
React Native SDK
2
Capture referral codes on landing pages
Set up a Referral Landing Page and capture referral codes (Or choose the appropriate guide for your flow:
ucc) when users click referral links. For Web signup flow, follow this guide:Web signup flow
Mobile signup flow
HubSpot forms
Typeform forms
3
Track signups
When users sign up or express interest in your product, attribute these events to their referrer for potential future rewards.Choose your preferred method to send signup events to Cello:
Track signups
Complete guide for tracking signup events
POST /events endpoint
API reference for sending events
4
Track purchases
Complete the conversion tracking by sending purchase events to Cello when users make payments.Choose your integration method based on your payment gateway:
Track purchases
Complete guide for tracking purchase events
Apply discounts
Apply discounts to referred users when creating a subscription
Stripe Webhook
Stripe webhook integration for purchase events
Chargebee Webhook
Chargebee webhook integration for purchase events
Integration Guides
Ready-to-use webhook integrations for Stripe and Chargebee provide the fastest path to track referral conversions automatically.Stripe Webhook Quickstart
Chargebee Webhook Quickstart
Performance enhancements
Recommended, not required The portal also shows recommendations (if they’re enabled for your account): enhancements scored across activation, sharing and conversion. See Performance Recommendations for how the score works. They don’t block Launch program, but they are what separates a program that performs from one that merely works. A referral program users can’t find doesn’t get used, however correct the integration behind it is. These are as much user-experience decisions as technical ones, so they may take some alignment before you build - worth starting that early. They’re also much easier to fold in while you’re already in the code, since they touch your navigation, your product’s key moments and your checkout.Shipping a minimal integration first and adding these later is a legitimate plan - just expect your performance numbers to stay low until they’re done.
Verify and launch
Work through the pre-launch testbook while you build, and again at the end. It covers the manual, front-end checks Cello can’t see for you: whether the referral component sits well in your UI, whether the new-user banner reads correctly, and whether the discount math is right on both monthly and yearly plans.Pre-launch Testbook
- The referral widget loads and opens for signed-in users
- Notifications work: badge, announcement, email
- New users land on the correct page from a referral link
- The new-user discount shows correctly at checkout
- Signups and purchases are attributed correctly